Vanguard Nomad Sailboat

The Vanguard Nomad is a 17' dinghy from the desk of designer Bob Ames, who also designed the Vanguard 15, and Vector. It is a beamy boat at 8', and carries 185 sq ft of sail. The boat was first built in 2003, and fewer than 300 hulls were built. The last were sold in 2009. Dave Reed in Sailing World Magazine described the Nomad as follows: "The Nomad was designed by Bob Ames, with input from Vanguard chairman Steve Clark. Both of them have speed on the brain, which is obvious in the Nomad. In his designer’s comments, Clark says, “Day sailing should equal pleasure sailing, and that demands an even better boat than a racing boat.” We wholeheartedly agree.
Ames’ answer was a hull and rig combination that’s “all about performance”—a boat with a fine entry, long waterline, super-wide beam (8-feet max at the deck), high-aspect rudder and centerboard, tapered mast, asymmetric spinnaker, and a 175-square-foot North 3DLrm sail inventory with roller-furling jib. Ironically, each of these raceboat attributes also make a great day sailing boat as well—the fine entry cuts through chop, the wide beam provides stability at the dock and when sailing, the deep blades enhance control, the tapered mast is easier to step and de-power, and rolling a jib is much quicker and easier than reefing a main."
The Nomad is supplied with a trailer, allowing easy transportation to your favourite launching area, but it can also be tied at a marina dock or left on a mooring. It takes about 20 minutes once you arrive at the boat ramp to set up the Nomad, and while it can be done yourself, having a second person speeds setup and launching. The self-bailing cockpit allows for worry-free mooring, even during a rainy period.
The Nomad can be single-handed, or five friends can comfortably join you. Solo sailor 'Nomad Tom' states:"I don't want complications as I'm usually sailing solo. I was out today in 10-15 kts of wind under main alone as I didn't want to be overpowered. While beating north the boat handled very well. It tracks beautifully with little to no weather helm. It slaps some of the waves, depending on the frequency and steepness of the boat that made them. It doesn't appear to be slowed down by them. It's a very dry boat with only occasional bow spray.
After twenty minutes of main only, I unfurled the jib and noticed an immediate increase in boat speed. The wind was strong enough that I had to luff the main to keep from burying the rail. I don't want to go over in this boat as I would not be able to right it. It will turtle fast, however, there are sail floats available to keep it from turtling.
Sailing solo is quite easy, though your hands are full, one hand on the main sheet, one on the tiller. Being able to douse/furl the jib with the pull of a line is worth the price of admission. I usually sail into and out of the launch area under just the jib. If I had crew with me, I'd probably raise the main at the launch dock and sail out with both sails flying. But single handling this boat, and hauling the main up the mast is a little bit of work."
Another anonymous owner stated: "I bought my Nomad new in 2005 but just sold her. Someone once referred to this boat as "The Lexus of Daysailers" and that's pretty appropriate. I had my boat out in 25mph winds several times in Tampa Bay and was never afraid. She's an incredibly stable boat as long as you don't fly the spinnaker in winds over 15 - 20mph. I've sailed this boat with 6 adults aboard and it was tight but comfortable.
If anyone is looking for a great family daysailer that's easy to rig and sail? You can't go wrong with a used Nomad."
The Vanguard has since been orphaned by its manufacturer, and, as the only other resource about this boat at YachtPals.com has been overrun by spammers, I felt it time to build a resource here. Over the next few months, I'll add a variety of resources and information about this boat.
See more Q & A in the blog.
Nomad specifications
| Dimensions | Imperial | Metric |
| LOA | 17.20 | 5.24 |
| Beam Max | 8.00 | 2.43 |
| BWL (Beam on the Waterline) | 5.39 | 2.43 |
| Lightship weight | 665.80 | 257.18 |
| Optimal Crew Weight | 560 | 254 |
| Race Weight | 1225 | 511 |
| Cruising Weight | 1325 | 552 |
| Mainsail Area | 122 | 11.33 |
| Jib Area | 53.18 | 4.85 |
| Spinnaker Area | 196 | 18.20 |
Links and information
Bob Ames website
Sailing World Article
Video
- by Bob Ames
- Everglades Challenge (in 7 parts)
Kinder Industries, makers of Nomad tents & covers, sail floats, and sail covers.
Selden Masts, Mast, Boom and Gnav
North Sails should still have the patterns for both the 3DR and the Dacron sails.
Glenmore Sailboats acquired all the NOS parts when Laser Performance ceased production of the Nomad.
Rigging Guide - electronic copy of the original paper manual.
Sailing Anarchy - A tale of righting a Nomad
Sail Tuning Notes
Here is some info on rigging the Nomad from Seve Clark who co-developed the boat along with Bob Ames. He basically said to rake the spreaders a bit aft of straight out board. I'm not sure exactly what holes things were happiest in, but the boat is pretty tolerant. Things that are "standard" work pretty well.
That is to say, you want plenty of rig tension as the breeze builds. This keeps the luff of the jib from sagging, which is how you keep the jib flat. The mast should be set up with a bit of pre bend. That is to say when the rig is pulled on snug there is a little fore and aft bend induced by the spreaders. You do not want the mid panel of the mast to sag to leeward, so if that is happening, you will want to shorten the spreaders. Try 3 holes showing If the mast looks like it is bowing too far to windward, then you will want to move the tip s out a hole or two. This is usually something that you can judge as you are sailing, and if things look abnormal, you can almost always sheet it soft and get home.
Try putting the shrouds someplace in the middle of the range on the hole adjusters. You should be able to pull pretty hard on the jib halyard and still have the mast raked aft by a fair bit. The lowers should be put such that they not really slack, but no where near as tight as the uppers when there is no vang on.
In a breeze, you want to flatten the mainsail. You do this by pulling hard on the out haul, hard on the down haul and by setting the vang pretty hard as well. Mast bend flattens the sail so you want to let it bend. One way is to let the lowers off a hole or two and by pulling harder on the vang tackle. The strut pushes the mast forward and thus induces a bunch of bend. You can, as a result ease the mainsheet quite a bit and still have a flat sail.
The Nomad is a pretty stable boat, but it is a center boarder and we wanted it to be pretty responsive. So you should expect to have to trim and ease the sails and to feather in puffs. This isn't a big heavy keel boat, so some agility and dexterity is necessary in response to changing conditions. If you stick with it, you will become more confident and comfortable with the capacities of the design. The thing to do is to take your time, recognize that it is a challenge and work your way forward.
TIP - tie a knot in the jib halyard once the mast is raised to prevent the mast falling should the halyard slip in the clam cleat.
See information on mast stepping below as well.
Frequently Asked Questions
How many people can sail in a Vanguard Nomad? You can comfortably sail single-handed or with up to 6 adults. There is also plenty of room to have up to 3 adults and 4 children.
Can one person rig and launch a Vanguard Nomad? One person can rig and launch a Nomad. You may wish for one other person to assist with putting the boat in the water either via a launch ramp or hoist.
How long does it take to rig and launch a Vanguard Nomad, from parking lot to water? You can be sailing in 20 minutes.
How can the Vanguard Nomad sailboat be stored? The Nomad can be stored on a mooring or onthe trailer.
What size car is needed to pull the Vanguard Nomad sailboat? The combined weight of the boat and trailer is about 1000 lbs which most cars have the capacity to tow. You should always check your car manual prior to towing.
How many storage compartments are there on the Vanguard Nomad sailboat and how big are they? There are four lockers in all. Under the seats in the cockpit are two 9 foot long lockers accessed by tipping up the seats.
What size engine can it have? 2-horse power.
Is the Vanguard Nomad a dry boat? The Nomad is an extremely dry boat and comfortable.
Is the Vanguard Nomad sailboat self-bailing? Yes.
Does the Vanguard Nomad sailboat capsize? Is it self-rescuing? Any boat can capsize, but Nomad with its generous beam, innovative deck, and lightweight rig is harder to tip over than most boats her size. The Nomad is unsinkable, and can be re righted after capsize.
Can you reef the Vanguard Nomad's main sail? No. To shorten sail, furl the jib. The Nomad sails well under main alone.
Can you trapeze from it? The Vanguard Nomad does not include a trapeze.
Information contributed by Nomad sailors
Many thanks to those who contribute bits and pieces of useful information about our boat.

One of the challenges many Nomad sailors have faced is getting back aboard having capsized. Ron Dejesus from Northern California shared some photos of the installation of a Garelick Compact EEz-in II Transom Ladder, and it looks to be a slick ladder and a very neat installation. Here are his comments:


Other options

Here is another option I found thanks to Ron's encouragement. A rope ladder stowed in a similar transom-mounted tube, manufactured by Osculati in Italy. It will fit in a vertical transom, and was a straightforward installation. As it appears only to be sold in Europe, I purchased it from a chandler in England.
As you can see from the photos below, it was a fairly simple installation. Care was necessary to determine the position of the hole, and filling the annular space between the liner and the hull took a few batches of 'kitty hair' fibreglass mix, and a little sanding.
Now I just need to wait for warm weather next summer to give it a test drive.


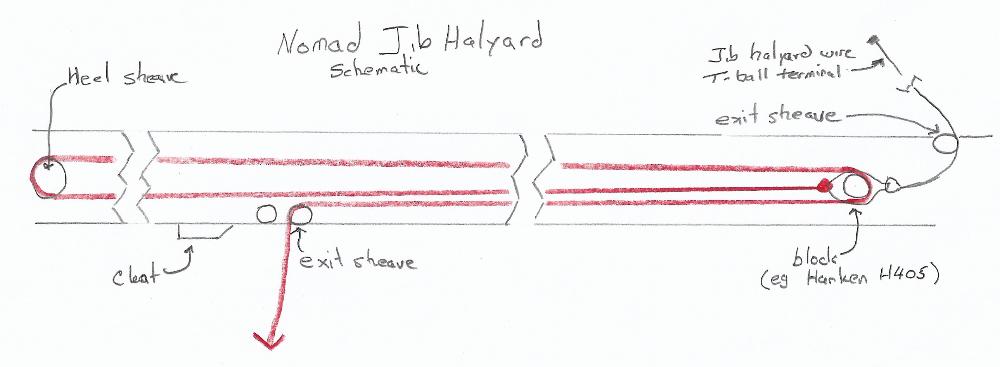
One of the frequent challenges faced by owners of the Nomad is tangled jib halyards. The jib halyard on the Nomad is a two-part unit; there is a 2:1 wire halyard largely outside the mast, and a 3:1 rope halyard inside the mast, connected by a block. This combination causes the rope inside the mast to twist upon itself, making it impossible, over time, to lower the mast. Bob Ames described the issue: "The halyard problem has a number of sources. First, laid wire and braided line are not the best combo, as the wire will untwist under load. Braided line is balanced so the wire causes the rope to twist. It can grab other lines and rivets along the way. If you coil the rope improperly it adds to the problem. If you keep the wire, you should replace the braided line with 3-strand pre-stretch. Seldon is shipping masts with this combo but I think the 4mm line is a bit small. A better solution (I may be trying this myself) is to replace the wire with rope and leave the purchase as is (braided line)."
Some tried simply replacing the jib halyard with a single line, and found that although the mast could be raised, the lack of purchase prevented sufficient tightening of the jib when underway, so it is necessary to keep both segments of the halyard as designed, even if replacing parts. Having tried numerous ways to disentangle the halyard in my mast I finally totally disassembled it, disentangled the rope, and reassembled it. Here are the steps I took:
Gather tools and parts needed: Large and regular Phillips head screwdrivers, pliers, butcher twine, a 4' length of wire and possibly a small cotter pin, hammer and a drill and drill bits, pop rivet tool.
Disassembly:
- Near the top of the mast is a sheave (e.g. SLD 50507101) held by pop rivets or screws. Remove this sheave, either by carefully drilling out the pop rivets or removing the screws. If pop rivets, carefully tap the remainder into the mast without enlarging the hole.
- Pull the wire halyard out of the mast, including the small block (e.g. Harken H405) attached to the end. Detach the wire from the block, and tie the twine to the block for later retrieval. Place the block back into the mast.
- Remove the mast heel plug from the base of the mast, pulling the entire rope halyard with it. You will need to ensure the bitter end also is withdrawn from the exit point on the mast. Either tie another length of twine to this so you can later recover it, or you can use the piece of wire at assembly. If necessary, dump the rivet ends by raising the mast until they fall out.
Disentanglement
- Disentangle the rope, and, remove any twists in it, then re-thread it through the blocks and sheaves remembering it should run from the becket of the block through the back of the sheave in the foot, then over the front of the upper block and down to the exit sheave on the rear of the mast. A length of wire inserted through the lower exit sheave pair, to the base of the mast will allow the easiest retrieval of the halyard through the sheaves; alternately, use the string you initially attached to the bitter end of the halyard.
Reassembly
- Having a second person holding the mast heel will help with reassembly. Draw the upper block up the length of the mast, pulling it out through the exit sheave opening. Reattach the Jib halyard wire (or a Spectra line of appropriate length if you wish) to the block. Put the block back in the mast and replace the sheave and carrier. Draw the halyard out through the lower exit sheave, and knot it. Replace the mast heel, while keeping the halyard snug, and you are done!
- If replacing the wire portion of the halyard with Spectra, a T-ball bail makes an easy connection for the end of the line to the mast.
- If replacing the rope portion of the halyard, it is recommended to lengthen it a bit to ease completing this task in the future.
| Note: | Feet | Metres |
|---|---|---|
| Jib Halyard | 52.00 | 15.850 |
| Jib Halyard wire: | 15.00 | 4.570 |
| Main Halyard | 47.75 | 14.554 |
| Spin Halyard | 46.00 | 14.021 |
Bob Ames - Nomad Designer
Re-rigging the Jib Halyard
2018-07-16 - Today I completed the replacement of the original Jib Halyard. It was as simple a process as disentangling the existing halyard, but should prevent a recurrence of the problem. To begin, I ordered the following from Annapolis Performance Sailing, who completed all the necessary work to prepare the lines:
- Yale Vectrus 12 line (3mm) finished with a 'Luggage Tag' eye splice at each end; 15 feet in length
- FSE Robline Dinghy Control Line (5mm) whipped at each end; 60 feet in length (consider having a loop spliced at one end of this line)
- T-Ball bail 1/16 - 1/8 rope-only fitting
I reused the existing block which attached the original wire to the rest of the halyard.
It was handy having a second person available help with the final alignment of the line in the mast - I wanted to be sure there were no twists, and carefully threaded it to match the sketch above. The extra length of Dinghy Control line was added, as it does not get drawn into the mast on disassembly. In addition, the distal end of the Vectrus line can easily have a length of twine attached instead of the T-Ball bail, and drawn into the mast without removing the upper sheave.
Once installed, the mast raised and lowered with greater ease than ever, and the upper halyard above the top of the Jib remained parallel, rather than twisting as in the past.
Now that I have an assurance that the mast can be easily raised and lowered, I can happily start to play with the shrouds.
Mission accomplished! A well spent $100.

A further advantage of using the Vectrus 12 line and T-Ball bail is the ease of removing the loop of line over the T-Ball bail. This allows the Luggage Tag loop to be threaded through the sheave at the top of the jib, rather than needing to remove the pin and sheave to insert the wire. Given this was a finicky task, with the possible loss of parts I'm really happy to slip the loop off the bail, thread it through the sheave, and re-attach the loop to the bail!
Mast Step
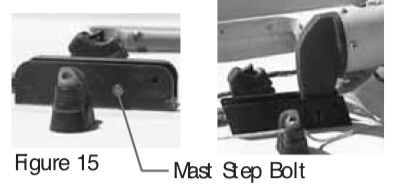
There has been some discussion on Sailing Anarchy, and in the comments on this site, about the placement of the pin for the mast heel and mast step. One discussion suggesting the forward hole is for the mast heel, and the rear one for the lifting bridle, while others described having broken mast heels or bent pins in their possession, claiming the forward hole placement puts great stress on the pin and heel. Given that there were two schools of thought - use the forward pin position or the aft pin position, it was time for some research! Reviewing the Vanguard Nomad Rigging Guide is confusing, as it speaks about placing the mast BOLT in the second hole back, which differs from the position shown in Figure 15 (left image). Additionally, the photo in the guide shows pin, not a bolt. It appears there are at least two different mast steps and mast heels used by the manufacturer during the few years the Nomad was produced. Even the guide shows two different mast steps in figure 15 of the rigging instructions. In the photo to the left, one of the mast steps has rounded corners, and the other is a parallelogram in profile. The mast heels appear to differ as well, with the one pictured being smooth-sided, while others have some amount of relief in the moulding, and an oval pin hole. My hull #356 has the mast step with the rounded upper corners. Today I finally moved the boat from winter storage, and had the chance to raise the mast. With the pin placed in the aft position, the mast heel does not touch the step, and all pressure is on the pin. Placing the pin in the forward hole allows the mast heel to make contact with the step. My conclusion is that for the mast step on my boat the forward pin placement is the one to create less stress on the mast heel and step, and allowing tension on the shrouds.
Edit May 4, 2018: Thanks to Chris H. for sharing the photo of the alternate, parallelogram-shaped step. In the notes accompanying the photo below he states: "Meant to send you a pic of my mast step earlier. I think it might be interesting to post pictures of yours and mine. There are two styles out there. On mine I can see someone tried using both holes but it seems clear to me that the forward hole is the right way to set up the rig."
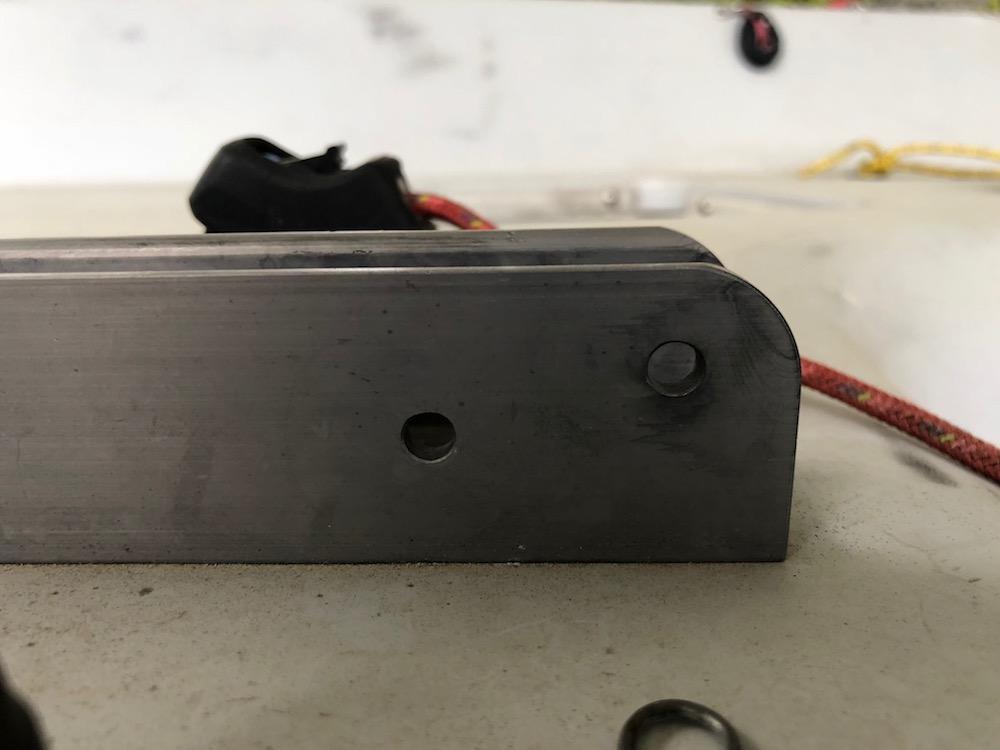
This is the mast step from my boat - Hull #356. It differs from that shared by Chris in the lack of an oval opening for the pin, and possibly an overall height difference. This step also uses a clevis pin and hair pin clip, rather than the bolt described in the rigging manual.
Your content goes here...
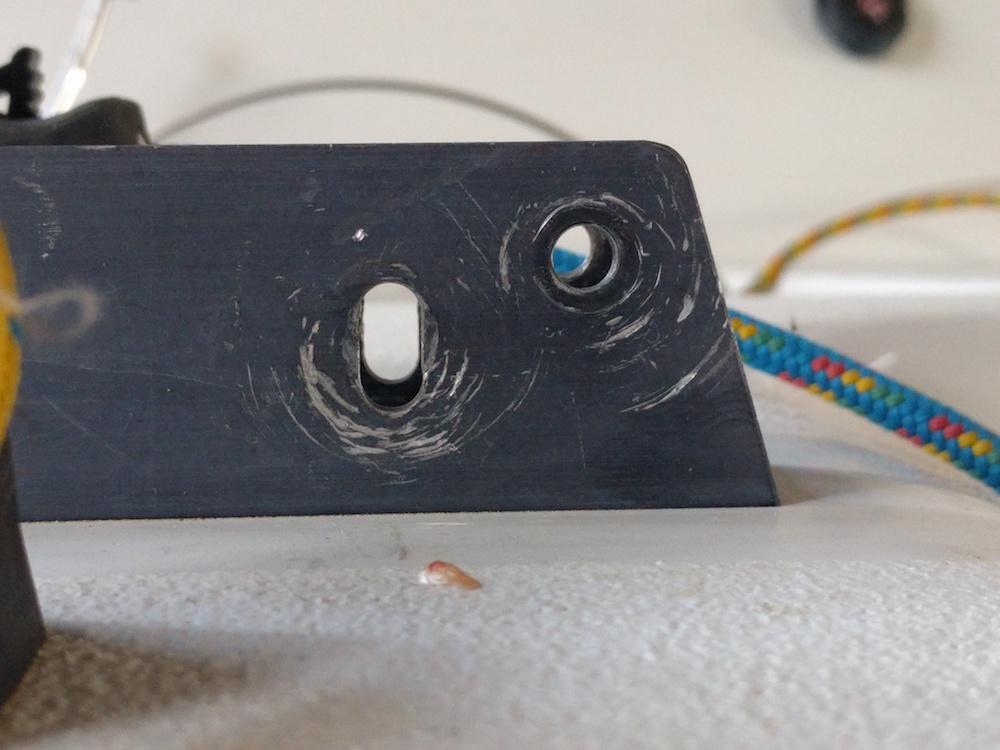
Chris H. shared a photo of the mast step on his boat. I note a number of differences including the slotted bolt hole, and indications of a wrench being used to tighten a nut, rather than a hair pin clip being placed through a clevis pin as on my boat.
June 20, 2018. Garth sent an email with the following comments:
"I popped in a new mast heel pin, and went sailing a few weekends ago. I am convinced the forward hole is correct, as the helm was perfectly balanced upwind.
We sailed in 8-12 knots, so the boat was pretty lively, especially in the puffs. Here are a few photos of the mainsail while sailing upwind. My only complaint is my full length battens are a bit loose. As you can see from the fuzzy fleece, it was a little on the cool side. The downwind was pretty sweet.
My upper shroud pins were ~1/2 way down the pin box. I was pretty aggressive on my lower shrouds, they were near the bottom of the box. This was lowest I've gone on both sets of pin boxes, but it felt really good in the puffy breeze we had. Reason for this is that I didn't want any side-bend in the mast in the "breezy-with-my-two-little-kids" conditions...If anyone is interested, and can look and see exactly which holes I was set up in. "


Just a quick platform to allow the storage of a small outboard motor, and a plastic tote containing life jackets and other bits and pieces needed for a day on the lake. It consists of two 2x6 cut to about 5 inches. and a series of thin strips attached across them to raise the platform above the boom and rudder.
Coming soon.


